
Mastering Valorant requires more than just sharp aim and quick reflexes; it demands a deep understanding of each map’s layout, strategic points, and a shared language for communication. This comprehensive guide for 2026 delves into the essential callouts, strategies, and tips for every competitive map in Valorant. Whether you’re a seasoned veteran or a newcomer to the tactical shooter, knowing the specific callouts can be the deciding factor between a round won and a round lost. Effective communication is the backbone of successful team play, allowing for precise coordination, swift rotations, and flawless execution of strategies.
In Valorant, callouts are standardized terms used to quickly and efficiently communicate enemy locations, player movements, and strategic intentions. This shared vocabulary ensures that every team member is on the same page, minimizing confusion and reaction time. From the tight corridors of Bind to the open sightlines of Breeze, each map has its own unique set of callouts that are critical for controlling key areas and anticipating enemy plays. This guide will break down the most important callouts for each map, providing you with the knowledge needed to elevate your tactical communication and lead your team to victory.
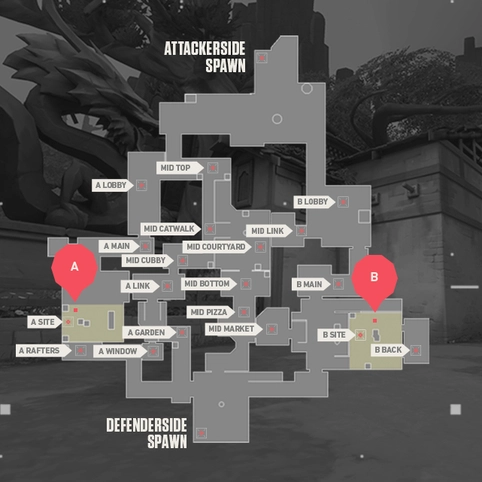
Essential Callouts and Strategies for Ascent
Ascent is a map defined by its open mid-section, which offers control over two mechanically-operated doors. Dominating Mid is often the key to winning on this map. Key callouts include “Mid Courtyard,” “Catwalk” leading to A site, and “Market” connecting Mid to B site. A common attacker strategy is a “Mid split,” where players push through Mid to attack either site from an unexpected angle. Defenders should prioritize holding Mid control, often placing a Sentinel agent like Cypher or Killjoy to watch for pushes. For A site, callouts like “A Main,” “Wine,” and “Heaven” are crucial. On B site, be aware of “B Main,” “Logs,” and the tricky “Boathouse” area.
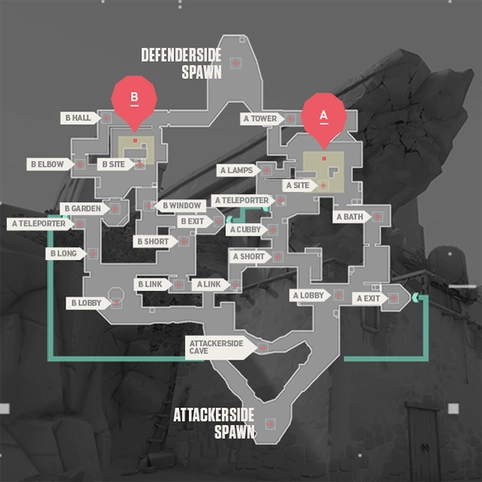
Navigating Bind’s Teleporters
Bind is unique for its two one-way teleporters, which allow for rapid rotations between sites. These teleporters make the map dynamic and unpredictable. The key callouts for the teleporters themselves are simply “TP” or “Teleporter.” The teleporter near A site exits at “B Long” or “Hookah,” while the teleporter near B site exits outside “A Showers.” For A site, players must know “Showers,” “Lamps” (also called U-Hall), and “Triple” (the stack of boxes on site). For B site, “Hookah” (the room with the window overlooking the site) and “Elbow” are critical areas to control. A successful strategy on Bind often involves faking a site push and quickly rotating through a teleporter to catch the defenders off guard.
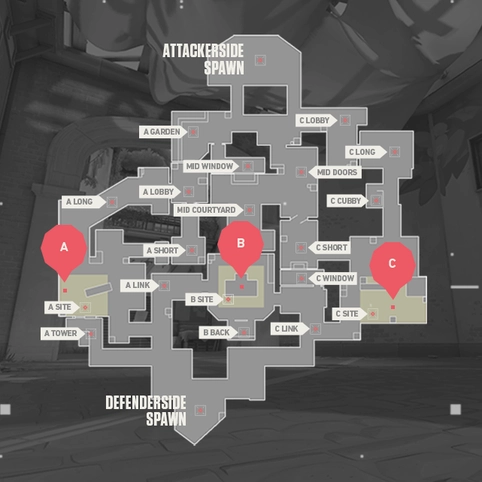
Controlling Three Sites on Haven
Haven stands out as the only map with three bomb sites (A, B, and C), making defensive setups and attacker strategies more complex. This larger layout means rotations are longer and more critical. Key callouts for attackers are “A Long,” “A Short” (also known as Sewers), “Mid Window” leading to B, and “C Long.” For defenders, holding “Garage” is vital as it provides a quick rotation path between B and C. On A site, callouts include “Heaven” and “Hell” (below Heaven). C site has the “Platform” and the long sightline from “C Long” to worry about. A common attacking strategy is to apply pressure across two sites simultaneously, forcing defenders to spread thin before committing to a single site execution.
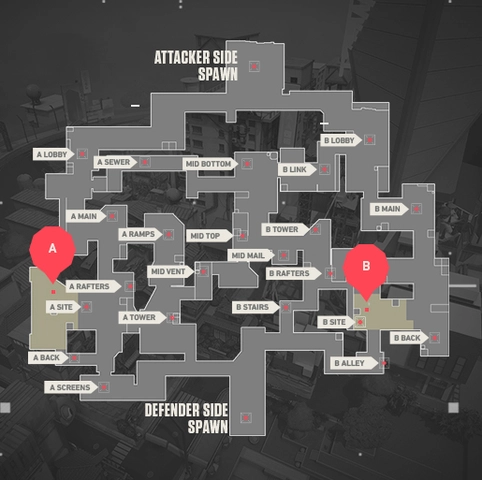
Verticality and Mid Control on Split
Split is characterized by its strong emphasis on verticality and a heavily contested mid-section. The map features ropes that allow players to move between levels quickly. “Mid Vent” and “Sewer” are crucial passages. Controlling “Mid Mail” is paramount for both teams. From Mid, attackers can split towards “A Ramps” or “B Heaven.” Key callouts for A site are “A Heaven” (the elevated platform) and “Screens.” For B site, “B Heaven” and the “Rafters” that run above the site are essential high-ground positions. Defenders often use agents who can control vertical space, like Omen or Jett, to maintain an advantage. Attackers, in turn, must effectively use utility to clear these elevated positions before pushing a site.
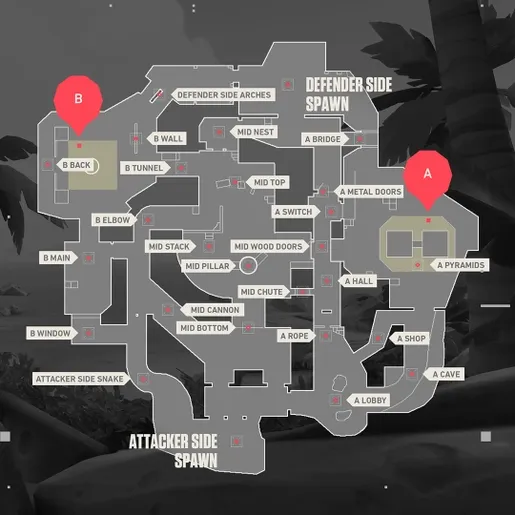
Mastering the Open Spaces of Breeze
Breeze is a large map with long sightlines, favoring agents with long-range abilities and precise aim. The wide-open spaces make controlling territory and using smokes effectively a priority. Key areas include “A Hall,” the “Pyramids” on A site, and the “Cave” which provides a flanking route. The B site is more enclosed but has multiple entry points through “B Main,” “B Tunnel,” and the “Window.” Mid control is also important, with the “Pillar” providing crucial cover. Due to the map’s size, rotations can be slow, making information gathering with agents like Sova or Fade incredibly valuable. Teams that can control the long angles and execute coordinated pushes will find the most success on Breeze.
By internalizing these callouts and understanding the fundamental strategies for each map, you will significantly improve your ability to work as a cohesive unit. Clear, quick, and accurate communication is a skill that separates good players from great ones. Spend time in custom games with your team to walk through the maps and practice your callouts. The more you use them, the more second-nature they will become, allowing you to focus on the clutch plays that win championships. Remember, in Valorant, a well-timed callout is just as powerful as a well-placed headshot.


More Stories
How to Go Pro in LoL or Valorant: Career Path Guide
LoL vs Valorant: Riot Games’ Two eSports Giants Compared
Valorant Crosshair Settings: Pro Player Configs & Tips